Equipment Reference

Oxlife INDEPENDENCE® Portable Oxygen Concentrator

A quick reference for day-to-day use of your Oxlife INDEPENDENCE — controls, power options, the retractable handle, and battery run times on one or two batteries. This page is a summary only. Always follow the manufacturer's full user manual and your physician's prescribed settings.
Safety essentials

Read before every use

  • Do not smoke when using this device. Keep all matches, lit cigarettes, candles and other sources of ignition at least 10 feet from the device.
  • Place the Oxlife INDEPENDENCE in a well-ventilated area, free of smoke and away from direct sunlight.
  • Make sure the air intake and exhaust ports are never obstructed.

Parts of the device

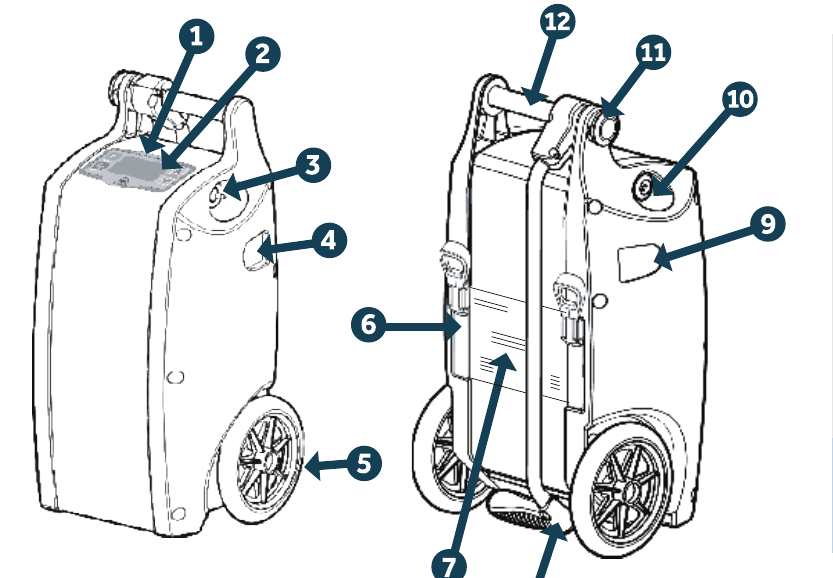
Front and rear views of the Oxlife INDEPENDENCE concentrator with twelve numbered callouts identifying the control panel, LCD display, oxygen outlet port, exhaust port, wheels, battery slots, FAA approval identification, pull handle, air intake port filter, external power input, handle lock release button and carry handle.
  1. Control panel
  2. LCD display
  3. Oxygen outlet port
  4. Exhaust port
  5. Wheels
  6. Rechargeable battery slots
  7. FAA approval identification
  8. Pull handle
  9. Air intake port filter
  10. External power input
  11. Handle lock/release button
  12. Carry handle

Using the control panel

The three buttons you'll use

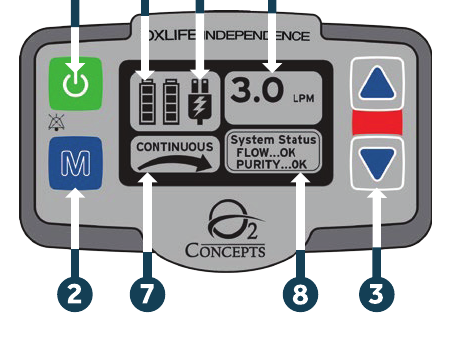
  • Power. Press and hold the power button to turn the device on or off.
  • Mode. Press the (M) button to select continuous or pulse flow mode.
  • Flow setting. Press the increase or decrease buttons to select the flow rate prescribed by your physician or medical provider.

What the display shows

  1. Battery status
  2. External power + battery charge indication
  3. Device flow setting
  4. Mode setting + breath detection
  5. System status
The Oxlife INDEPENDENCE control panel showing the green power button and blue M mode button on the left, the battery and charge indicators and flow setting display in the center, the up and down arrow buttons on the right, and the continuous mode and system status readouts along the bottom.
Oxlife INDEPENDENCE control panel

Running on AC and DC power

AC power supply (wall outlet)

Make sure the cord is firmly seated in the brick, then connect the power supply to the Oxlife INDEPENDENCE and to the wall outlet. The external power source icon will be displayed on the control panel.

DC power supply (vehicle)

The DC power supply powers the INDEPENDENCE from a vehicle's 12/15 volt DC outlet at all settings. Connect the power cord to the device first, then to the DC outlet — use the outlet closest to the engine.

Always have the vehicle's engine running before plugging in your Oxlife INDEPENDENCE.

DC power will not always charge your batteries

DC power is not sufficient to charge batteries at all settings. Charging will not occur on DC power at settings higher than continuous 2.0 or pulse 4.0. Plan on arriving with less charge than you left with if you're travelling at a higher setting.

DC power output varies among vehicles. In some cases, operating the device on DC power at higher continuous settings may require installing an inverter in the vehicle.
Opening and closing the handle

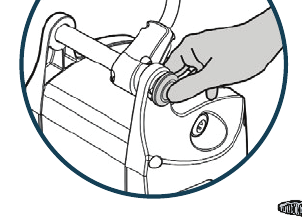
  • Press and hold the handle lock/release button to unlock the handle.
  • Begin rotating the handle, then release the button — the handle will re-lock in the open or closed position automatically.
Close-up illustration of a thumb pressing the handle lock and release button while rotating the pull handle of the Oxlife INDEPENDENCE.
Handle lock/release button

Batteries: installing, removing & managing charge

Installing and removing

  • To install: hold the battery with the connection to the bottom and the tab on top. Slide it into the back of the device and press to engage — the battery will drop down slightly and click into position.
  • To remove: pull the tab out slightly to release it from the bay, then pull up and out on the tab to slide the battery out.

Reading the charge indicator

  • Battery charge status is displayed in the upper left portion of the control panel.
  • Each bar indicates a 25% charge; a solid bar indicates a 100% charge.
  • A lightning bolt indicates the battery is charging.

The Oxlife INDEPENDENCE runs on battery, AC power cord or DC power cord. Using the AC or DC cords whenever possible will preserve battery life.

You will get longer battery run time in pulse flow mode. However, pulse flow mode should only be used under the direction of your physician.
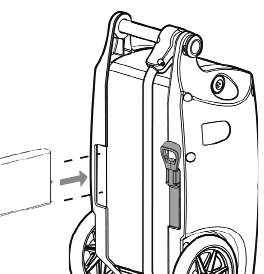
Illustration of a battery pack sliding into the battery bay on the back of the Oxlife INDEPENDENCE concentrator.
Installing a battery

Typical battery operating times

Run time by flow setting and number of batteries
Flow rate setting Continuous flow Pulse flow
1 battery 2 batteries 1 battery 2 batteries
0.52 hr 53 min5 hr 45 min3 hr 8 min6 hr 15 min
1.02 hr 38 min5 hr 15 min3 hr6 hr
1.51 hr 45 min3 hr 30 min3 hr6 hr
2.01 hr 15 min2 hr 30 min2 hr 53 min5 hr 45 min
2.51 hr2 hr2 hr 53 min4 hr 45 min
3.045 min1 hr 30 min2 hr4 hr
3.51 hr 45 min3 hr 30 min
4.01 hr 30 min3 hr
4.51 hr 15 min2 hr 30 min
5.01 hr 8 min2 hr 15 min
5.51 hr2 hr
6.053 min1 hr 45 min

Continuous flow is available at settings 0.5–3.0. Settings above 3.0 are pulse flow only.

Pulse flow times shown are based upon 20 breaths per minute.

Battery operating time will degrade with battery age, number of charge cycles and operating environment.

Download the printable guide

Keep a copy in your travel bag or with your travel documents.

This page is a convenience summary prepared by High Country Oxygen from the manufacturer's Quick Reference Guide (document 800-1012 Rev G). It is not a substitute for the complete user manual. For full instructions, warnings and specifications, refer to the manual supplied with your device or visit o2-concepts.com/products. Oxlife INDEPENDENCE® and O2 Concepts® are trademarks of their respective owner. Never change your prescribed oxygen settings without direction from your physician.